Saturday, September 3, 2011

Fitted Diapers Part 2

As I blogged about before, I tried to make fitted diapers.  The first ones did not turn out so well.  Since then I have played around with the design and produce some much better ones.

As I said, I used the pattern from here.  http://www.diapersewing.com/fitted_with_velcro.htm  I shortened the middle by about 3/4 of an inch.  I also made my elastic a bit tighter.  This one here has 4 layers of cotton flannel, with a 4 layer cotton soaker in the middle.  It is also most too thick as it takes forever to dry, but it fits him well.


This is another one I made.  The shape is a little off, but it is nice as well.  I used red flannel inside and sewed black minky on the outside.


Thursday, September 1, 2011

Glow Bug Diaper Review


I recently had the opportunity to get a free sample diaper from Glow Bug Diapers.  They are a relatively new business based in Barrie, Ontario and have been giving out free samples to promote their business.  They sell their diapers for $150 for 12.  You can not buy them singly thus they are giving out samples to try before you buy. GlowBug diapers are a one size pocket diapers.

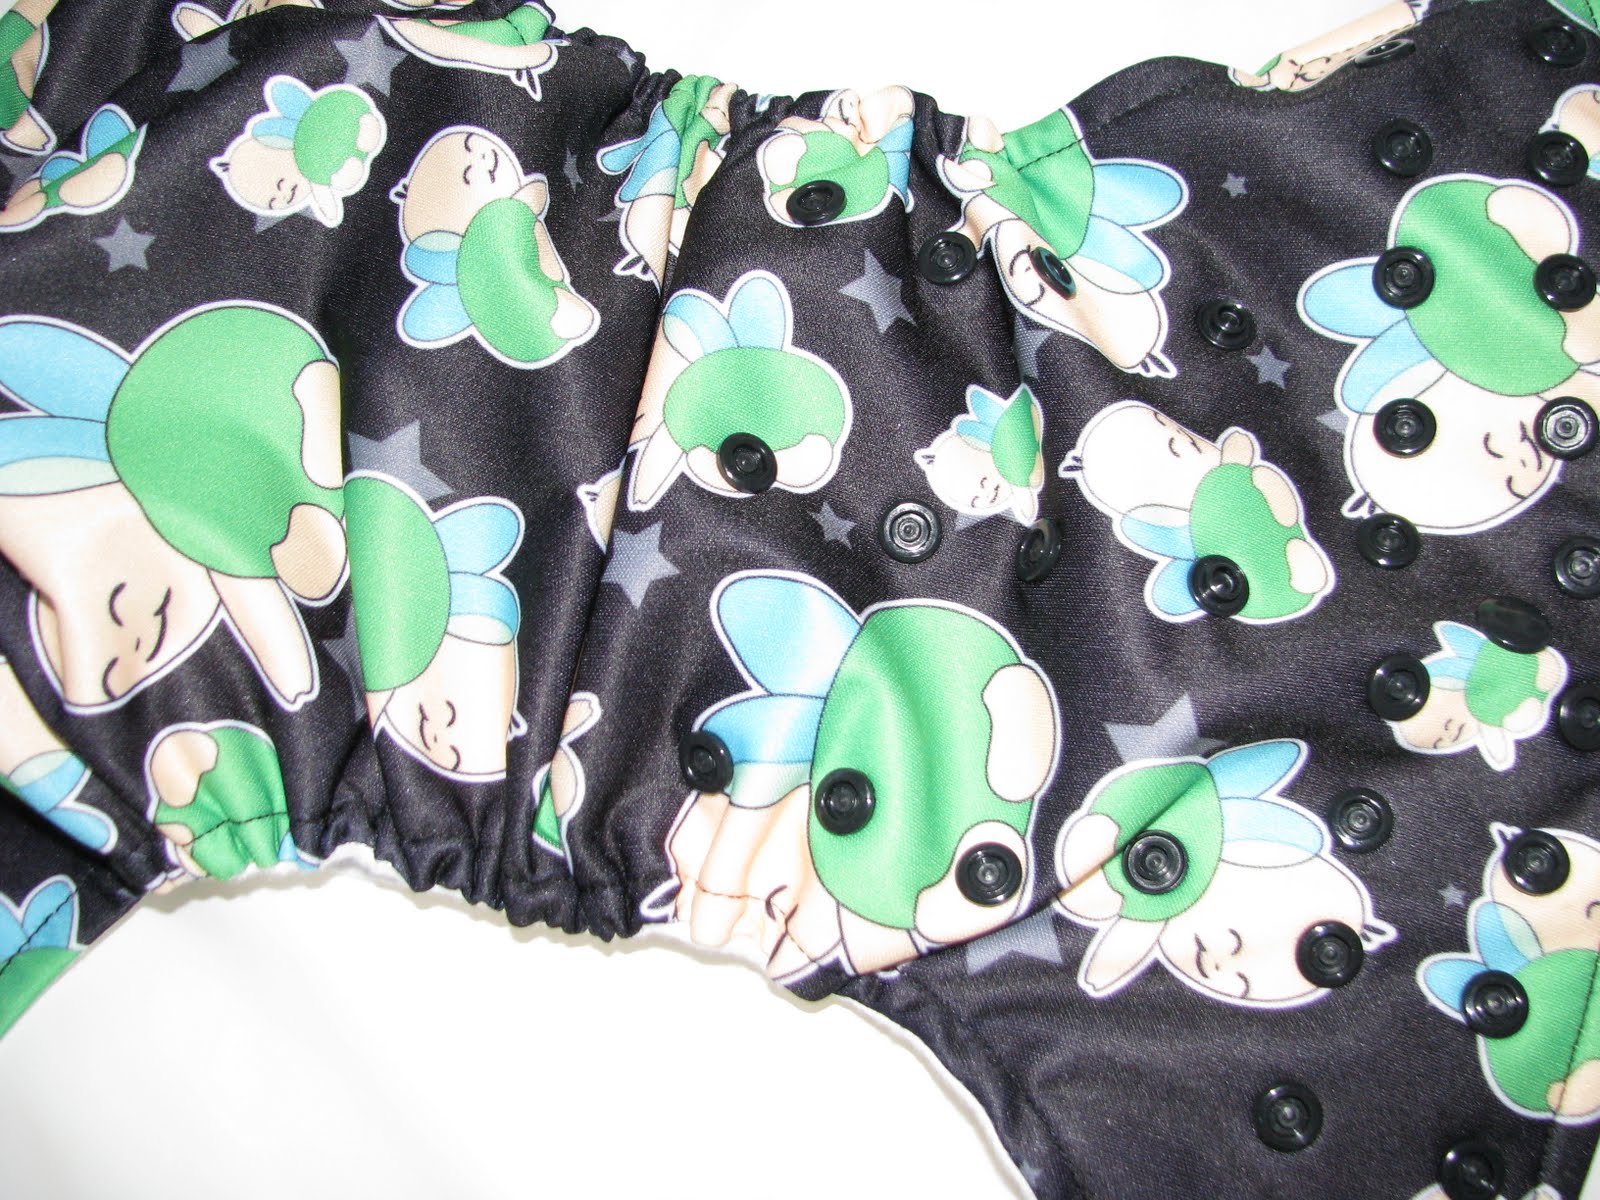
The sample print is black with the glow bug on it.  It comes with two microfibre  inserts that can snap into the diaper.It is a little hard to see, but it has 4 rise snaps which can make it easier to get a better fit.  Most one size pocket diapers only have 3 rise snaps so you have much more versatility with this diaper.


The Glow Bug diaper has an inner gusset.  This inner gusset is good when it comes to messy poops to avoid it going to the edge.  Virtually every time my son has worn this diaper, he has pooped.  The poop has always been contained and did not go beyond the inner gusset.  This is a nice design feature as you avoid any leakage on the leg.

The diaper all stuffed.  As you can see from this picture, that rather than just having a single snap, there are double snaps on the front of the diaper.

Inside the diaper, there is a place to snap in the insert.  The diaper comes with two inserts that can snap in.  Only one insert though can be snapped in at a time. The other would have to be placed on top of the other insert.   Typically I take the insert out before I put the diaper in the pail.  I decided to leave it on to wash it.  It comes off in the wash.  It sometimes flips the diaper inside out, but in the end it does come out clean.

Here is the back of the diaper.  As you can see, there are openings at either end of the diaper.  This makes it very easy to put the insert into the diaper.


 Here is a close up of the front of the diaper.  You can see the 4 rise snaps here, as well as the double row of the front snaps.


 Here is my son wearing the diaper.  In this picture he has the top rise snap done up so he is on the 3rd setting.  He has grown since this picture and now wears the diaper unsnapped.
 As you can see, the diaper fits nicely around his chubby thighs.

 He is quite content wearing his diaper.
I did not try this diaper overnight.  Pocket diapers do not work overnight with my son as we now use wool and a fitted diaper.  It worked very well for the daytime.


PROS:  
Overall, I do like the GlowBug Diaper.  It does have many nice features.  The elastic is very soft and does not leave red marks.  The snap in insert is very handy to use. I like the inner gusset.  It ensures that messes stay inside the diaper and do not try to migrate out.

Their customer service is great.  The first sample diaper I was sent ended up being a dud as the elastic on one leg detached.  I emailed them about it and they were quite concerned and upset. Together we troubleshooted what went wrong to ensure that it would not happen again.  They are very concerned about quality.  Even though I had paid nothing for this diaper, they sent me out another one for free.  The second diaper has been working great, and I have had no issues with it.

The prints that come in their packages which are Girl, Boy, and Spectrum are quite nice.  Their boy prints are pretty colourful.  I love their girl prints.  They are so feminine.  They Spectrum are quite colourful and the snaps on them are multicoloured which would be great to help a grandma or dad know which snaps to snap to.


CONS:

Some cons to this diaper is that I do find when I put it on with the snapped insert in place that it causes a bit of a gap at the front and sometimes pulls the diaper down a bit.  It also seems as if the snap is placed too close to the top.   It also does take some getting used to using two snaps at the front.

As I said this diaper retails in a package for $150 for 12.  That works out to $12.50 a diaper which is very reasonable.  A con to me is that I am not one to have lots of one type of diaper as I like variety.  I also don't tend to have a large amount of money to spend at one time on diapers, so buying 1-2 at a time is more affordable for me.  They do suggest to go in with your friends to buy one, but I do not have too many real life friends that CD.

The prints that come with them are preset.  You get 1 of each in the package.  There is no mixing of packages.  It is either all boy, all girl, or Spectrum.  I like to have variety and not being able to choose isn't fun  to me.

Final thoughts.
Overall, I do think that this is a good quality diaper.  It is not too hard to put on.  It comes in a wide variety of prints. It is easily able to be adjusted and I am sure would fit from a small baby to a larger one quite easily.  My son is now 20 lbs and on the highest rise, but I still need to do it up near the middle.  At 12.50 a diaper, it does easily beat the price of more expensive brands.  If you are looking for a diaper to start your stash with, the Glow Bug diaper does offer you a very cost effective way of purchasing several diapers at once.


Want to own a GlowBug Diaper of your own , visit:  Glow Bug Diapers or check them out on facebook Glow Bug Cloth Diapers


I was not compensated for this review.  These are all my own opinions.

Life gets so busy sometimes.

I have lots of blog entries coming up.  In the evenings I seem to have a choice to blog, craft, or do chores.  So unfortunately the blog sometimes gets the short end of the stick.  So up coming will be some recipes, reviews, and crafting.

Wednesday, August 17, 2011

Benjy is getting bigger

Benjy has his 4 month check up last week.  He is getting bigger every day.  At his 4 month check up he was 18lbs 3oz and 26.5 inches long.

He seems to be going through stages where he wants to be held constantly to being able to be more independent.  He really is enjoying being in his exersaucers.  He is becoming more aware of his surroundings and beginning to recognize words that we say like Bath ( or Scrub-a dub) time, booby, Mommy, Daddy, Bacon ( our cat), and Memere.


Here he is with is bunny that seems to be getting smaller by the day.

Monday, August 8, 2011

Making Fitted Diapers


I have tried making covers, but those didn't go so well as I have no PUL to ensure that they are waterproof.  What I can sew very easily are fitteds as I have all the material on hand. 

This is my first attempt at a fitted that didn't involve modifying a previous diaper. 

I followed this template http://www.diapersewing.com/fitted_with_velcro.htm


Attempt #1- Followed original pattern


Attempt #1  - Too big

Fits fine in waist, Large gaps at legs


Attempt #2- Shortened middle length by 2 inches

Too short of a rise


Attempt number 3 will involve shortening middle by 1 inch

Sunday, August 7, 2011

Suck pads for the Ergo with Pictures

Have I mentioned that I am cheap?  I hate to pay a lot of money for something that I can make myself.  I think this comes from the fact that my mom used to do stuff like this.  Mind you if I can't make it, I am willing to pay for it, but if it is simple enough to make, I will do it myself.

This is one of those things that I decided to make myself.  I really like my Ergo, but my little buddy boy is starting to suck on the sides.  So following the directions from this lovely blog Lu Bird Baby, I sewed myself up a pair of suck pads rather than buy some.  My sewing skills are not amazing, but if it is a straight-line, I can do that.


I made a matching pacifier hold.  


This is a set I made with flannel back and cotton front
Three sets I made for friends
Cotton knit front, Fleece back


I made a minor modification as I used fleece for the backing instead of the terry cloth as I didn't have any on hand.  Since this will go in his mouth I do want to make a set made out of all cotton.  Well I did make a set, but I screwed up my sewing on that one as they turned out two different sizes so it went into the reject pile.

I realize that my colours of blues are a little off so next time I am at a fabric store, I will try to find a colour that blends with my Ergo better.

Friday, August 5, 2011

Car Seat Cover Tutorial

I like seeing all the extras that are out there for babies.  Often times I like them, but honestly don't have the money to purchase them.  Being on mat leave is a blessing as I get to stay home with my son, but doesn't leave much extra money to go around.

The car seat cover is very basic.  Often when I make something, I will copy it off the original, but I didn't have one to copy so I used my handy dandy tape measure and measured my car seat.  The final number was 42 inches long by 30 inches.  This was the dimensions of my Graco Snugride carseat.  I imagine it will work for most others, but it doesn't hurt to measure it.

The car seat covers I have seen online often have flannel or satin backing.  I didn't want it to be too heavy so instead I used cotton knit.

So what do yo need to make this

Basic sewing skills
1 yard of cotton
1 yard of cotton knit ( or flannel if you prefer)
thread
Hook and Loop

The fabric I was working with had  a width of 44 inches, so I just measured the length (30 inches).  I cut one cotton and one cotton knit at that size and sewed the right sides together.

I got most of the way around before I left a small gap so I could turn them right side out.  I then went around and sewed an additional hem around the outside.


The next step was making the handles to attach it to the car seat.  The first ones I made were far too long.  Cut a 2 inch by 16 inch strip of fabric. Then double it so it is 8 inches.  Sew the right sides together and then flip.  At the 4 inch mark, cut it in half.  Now sew the ends closed and stich all the way around.

See they are very long

I need to short these on mine.
At hook and loop at the ends so that it is easy to remove the car seat cover.


The next step is a little tricky, but at  4 inches in pin the first strap, then 3 inches and pin the second strap.
I suggest pinning the straps on and if possible trying it out on your car seat to make sure that it works well for you.  If it does, sew on the straps.  As easy as that you are done and have a car seat cover that cost a fraction of what it costs to buy one.  I think this sewing project took me about an hour to complete.